Learn how to get started using the (new) CSV Import API for managing your user base.
User Management via CSV Import API is one of the easiest and most scalable ways to manage users on the Staffbase platform. The functions and capabilities that the CSV Import API offers are similar to those of the manual CSV import in the Staffbase Studio. The main difference is that with the CSV Import API, the script runs on an automatic schedule. This reduces or eliminates manual efforts, and comes with some additional capabilities.
Similar to manual CSV import, you need to actively push or upload the CSV file from your local environment to the Staffbase platform for automatic CSV import. You can do this with upload and update requests to the Staffbase endpoints. These calls are always performed in succession for the automatic CSV import. With the CSV Import API, Staffbase supports both complete imports and selected user imports. The selected user imports are also referred to as delta imports. Use this guide to get started with the automatic CSV import using the CSV Import API. The examples provided in the instructions use the cURL command line.
- You have the user data in CSV file format.
- The identifier for each user is defined in the CSV file.
If you already have existing users in the platform, ensure the identifiers are set and match the identifiers in the CSV file. - You have generated an API token with administrative access via the Staffbase Studio. Learn more.
- You have a good understanding of the new CSV import via the Staffbase Studio.
- You have the (new) CSV Import enabled for your platform.
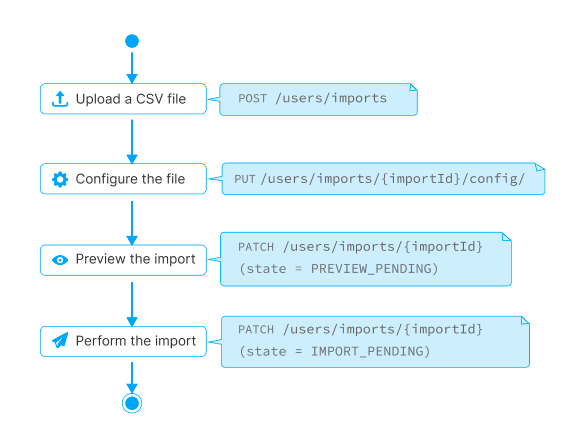
The process of performing an automated CSV import in a nutshell.
- Upload a CSV file by sending the
POSTrequest to/users/imports/. - Configure the CSV file mapping by sending the
PUTrequest to/users/imports/{importId}/config/. - Optionally, preview the import changes by sending the
PATCHrequest to/users/imports/{importId}with state parameter set toPREVIEW_PENDING. - Import the file by sending the
PATCHrequest to/users/imports/{importId}with state set toIMPORT_PENDINGin the request body.
You can find examples of CSV files on our Support Portal.
Make a POST request to the endpoint /users/imports with the path of the CSV file in your local computer.
Example request
The following cURL command uploads a new CSV file from your local computer to your Staffbase platform.
1curl -X 'POST' \2 'https://exampleapp.staffbase.com/api/users/imports' \3 -H 'accept: */*' \4 -H 'Authorization: Basic {Token}' \5 -H 'Content-Type: multipart/form-data' \6 -F 'file=@showcase_user_export_2024-03-06.csv;type=text/csv'
Your CSV file is uploaded to the Staffbase platform. You can view it on the overview page of the Staffbase Studio.
In the response header, you can see the location URL of the imported file.
For example, https://exampleapp.staffbase.com/api/users/imports/660e76a12487882f89a095b4e
You can save the id from the response. In this case, 660e76a12487882f89a095b4e.
This id is the importId required for further steps.
Do the following to map the CSV attributes to the Staffbase Studio profile fields:
- Make a
GETrequest to the endpoint/users/imports.
Example response1curl -X 'GET' \2 'https://exampleapp.staffbase.com/api/users/imports?limit=20' \3 -H 'accept: application/json' \4 -H 'Authorization: Basic {Token}'
12{3 "entries": [4 {5 "id": "64b0fbf58e05e970f88a2791",6 "createdAt": "2023-07-14T07:40:37.478Z",7 "fileName": "mariokart_user_export_2023-06-14.csv",8 "fileSize": 2010,9 "recordCount": 8,10 "state": "DRAFT",11 "owner": {12 "ownerId": "645de133f3e49f6b7f78cfff",13 }14 }15 ],16 "nextCursor": "NjU0YjU3ZDBhZTBjMmQzNTc2OTk3NTU4_dHJ1ZQ",17 "prevCursor": " NjU0MzUxMjNmNmJiMzA0ZjRiZmEzOWYy_ZmFsc2U"18}
- Save the id from the response. This id is the
importIdrequired in the next step.
If there are multiple imports, you can identify the import you want based on the following parameters:
- createdAt
- fileName
- ownerId
- Make a
PUTrequest to the endpoint/users/imports/{importId}/config, with the following details:
| Parameter | Description |
|---|---|
delta | The parameter that defines if all users or only a subset of users should be included in the import.
|
encoding | The character encoding used in the CSV file.
|
generateRecoveryCode | The parameter that defines if recovery codes need to be generated or not.
If the CSV file includes recovery codes and the parameter generateRecoveryCode is also set to true, the recovery codes from the CSV file will be used. If the CSV file does not contain recovery codes, new ones will be generated. Also, you need to ensure that the recovery codes are correctly mapped to the property recoveryCode. |
reportMailAddress | The parameter to add a recipient email address for the processed CVS import report. |
reportOnlyErrors | The parameter that defines if an email only needs to be sent to the reportMailAddress recipient if an error occurs. |
sendMailsNew | The parameter that defines if invitation emails need to be sent to new users.
|
sendMailsPending | The parameter that defines if invitation emails need to be sent to pending users.
|
separator | The field separator used in the file to separate the values.
|
mapping | The parameter that holds the mapping between the CSV column and the respective profile field in the Staffbase platform. See CSV Import mappings. |
1curl -X 'PUT' \2 'https://exampleapp.staffbase.com/api/users/imports/{importId}/config' \3 -H 'accept: */*' \4 -H 'Authorization: Basic {Token}' \5 -H 'Content-Type: application/json' \6 -d '{7 "delta": false,8 "encoding": "UTF-8",9 "generateRecoveryCode": false,10 "reportMailAddress": "recipient@company.com",11 "reportOnlyErrors": false,12 "sendMailsNew": true,13 "sendMailsPending": true,14 "separator": ";",15 "mapping": {16 "profile-field:firstName": "First Name",17 "profile-field:lastName": "Last Name",18 "externalId": "Identifier",19 "userName": : "Identifier",20 "profile-field:position" : "Position"21 }22}'23
You can map one column from your CSV file to multiple fields. For example, identifier maps the externalId and userName based on the same column. The example above shows this case.
See CSV Import error list to help you analyze your CSV import and get more information on potential warning and error codes.
After configuring the mapping, you can preview the file.
This is an optional step.
- Make a
PATCHrequest to the endpoint/users/imports/{importId}, with state parameter set toPREVIEW_PENDING.
1curl -X 'PATCH' \2 'https://exampleapp.staffbase.com/api/users/imports/{importId}' \3 -H 'accept: */*' \4 -H 'Authorization: Basic {Token}' \5 -H 'Content-Type: application/json' \6 -d '{7 "state": "PREVIEW_PENDING"8}'
You get a 204 response.
- Make a
GETrequest to the endpoint/users/imports/{importId}/status.
Example responsecurl --location 'https://exampleapp.staffbase.com/api/users/imports/{importId}/status' \--header 'Authorization: Basic {Token}'
1{2 "totalLines": 5,3 "completedLines": 3,4 "status": "PREVIEW_READY",5 "changes": {6 "created": 5,7 "updated": 0,8 "deactivated": 0,9 "deleted": 0,10 "errors": [11 {12 "line": 2,13 "subject": "column",14 "property": "name",15 "value": "Gustav"16 }17 ]18 }19}
You can view the changes that come with the import in the response.
Make a PATCH request to the endpoint /users/imports/{importId}, with state parameter set to IMPORT_PENDING.
1curl -X 'PATCH' \2 'https://exampleapp.staffbase.com/api/users/imports/{importId}' \3 -H 'accept: */*' \4 -H 'Authorization: Basic {Token}' \5 -H 'Content-Type: application/json' \6 -d '{7 "state": "IMPORT_PENDING"8}'
You can now schedule the imports and updates based on your business requirements using this CSV import workflow. You can use any scheduling tool of your choice. For example, if you're using the cURL command-line for Unix or Linux, you can use the cron job command for scheduling.