Learn how to build a Countdown widget on your own
Custom widgets are web components that you can add as specific content blocks to News or Pages on the Staffbase platform. In this tutorial, we take you through how to build a basic Countdown widget on your own and make it available on News or Pages. After completing this tutorial, you’ll be familiar with the widget building process and can start building custom widgets based on your business requirement.
You can find more Staffbase custom widget examples here.
Custom widgets cannot be made available in the public area of your app.
A Countdown widget provides your users a countdown timer to major upcoming company events. This can be created as part of a campaign to build excitement and readiness around an anticipated event. Your editors can add the widget to News posts and Pages like other standard widgets.
Once you build the widget, install it on the Staffbase platform to make the widget available on News and Pages. Your editors can configure the widget with the event date in a News post or a Page.
Users, in turn, will see how much time is left until the event based on the event date entered by the editor.
This tutorial is designed only to help you start building a Countdown widget on your own, a basic version is shown here. Feel free to use this as a base to build more improvements and features on it, and design the Countdown widget suited best for your requirement. For instance, you can improve this further by adding a date picker for the Event Date field, a teaser message for the countdown, or even a check-in button for users attending the event, and much more.
- The page to install and manage custom widgets is enabled for your organization. Reach out to your Customer Success Manager if it is not enabled.
- Node.js version 18 or higher and Node Package Manager (npm) version 9 are installed on your computer.
If you have a higher version of Node.js, you need to revert to the version specified above.
-
Create a project folder with the name
Widgetin your local drive. -
In the terminal, run the command to navigate to the directory where you created the project.
For example,cd /Users/.../Documents/Widget -
Run the command to create resources and files in your project.
npx @staffbase/create-widget
The terminal prompts you to give the widget details.
- Provide the following information:
- Name of your organization: Enter the name of your organization.
- Name of your widget: Set the widget name as
countdown-widget.
The custom widget name must include at least one hyphen. For example, my-widget.

A new folder named countdown-widget has been created under your project folder. All the required resources and files will be added to this folder.
- Run the command to navigate to the countdown-widget folder in your project.
cd countdown-widget
- Run the command to install the dependencies.
npm install
Now, you have created your custom widget project.
The preview shows how each of these views will look like:
- Configuration dialog of the widget to editors in the Staffbase Studio
- Final widget content for end-users
- In your development environment, open the
countdown-widgetfolder. - Run the command to start the project.
npm run start
The developer preview opens.
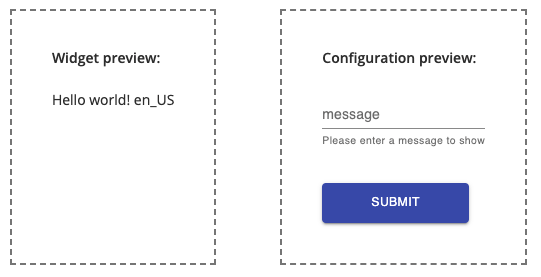
- Type your message and click Submit.
Your message will be displayed under Widget preview.
While this is a convenient mockup preview, it does not represent the final look and feel of the configuration dialog in the Staffbase Studio or the final end-user view.
You have successfully installed and started your custom widget. Now you can define the Countdown widget.
You already have the base project for your custom widget. As the project is currently a simple hello world, you need to remove some properties and add new ones to define functionalities for the Countdown widget.
This file gives you the possibility to define the Configuration dialog for the widget in the Staffbase Studio. The data scheme used in the file follows the JSON Schema standard. Learn more about it here.
-
Under the
srcfolder, open theconfiguration-schema.tsfile. -
Replace all the values
'message'with'enddate'as shown in the code snippet. The propertyenddateallows you to define the event date for your Countdown widget later.
1export const configurationSchema: JSONSchema7 = {2 properties: {3 enddate: {4 type: 'string',5 title: 'enddate',6 },7 },8}910/**11 * schema to add more customization to the form's look and feel12 * @see https://react-jsonschema-form.readthedocs.io/en/latest/api-reference/uiSchema/13 */14export const uiSchema: UiSchema = {15 enddate: {16 'ui:help': 'Please enter a message to show.',17 },18}
- Under
export const configurationSchema, modify the following properties:
type: Replace"string"with"number"title: Replace"enddate"with"Event Date"
1export const configurationSchema: JSONSchema7 = {2 properties: {3 enddate: {4 type: 'number',5 title: 'Event Date',6 },7 },8}
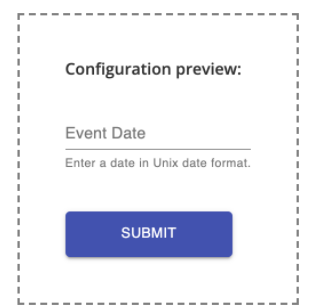
This modifies the type value entered in the field label of your widget configuration.
- To add a help text for the Event Date field, modify the
ui:helpvalue to"Enter a date in Unix date format".
1export const uiSchema: UiSchema = {2 enddate: {3 'ui:help': 'Enter a date in Unix date format.',4 },5}
Since this is a basic tutorial, we will not develop a date picker. You can use this as a base and improve the functionalities.
- Save the changes.
You can view the changes in the developer view.
The index file contains the main class, which is invoked in the registration call and the block definition for the metadata.
Avoid adding too much business logic into the index file. If you need to, move them into a separate module. This ensures that you don't unintentionally break the implementation when making future changes.
In the index file, declare the metadata used in the configuration file in your index file.
-
In your development environment, navigate to the
srcfolder. -
Open
index.tsxfile. -
Scroll to the code snippet where
const widgetAttributes: string[]is defined. -
Replace the value
'message'with'enddate'so that the widget reacts to the changes made to the attribute.
const widgetAttributes: string[] = ['enddate']
- Save the changes.
The widget file is the view layer of your widget and will be called by the main class. It gets all of the attributes as properties.
- Under the
srcfolder, open thecountdown-widget.tsxfile.
If you have named your widget differently the file name will vary accordingly.
- Replace
'message'with'enddate'and'string'with'number'inCountdownWidgetProps export.
export interface CountdownWidgetProps extends BlockAttributes {enddate: number;}
- Paste the following code snippet before
export function const CountdownWidget.
1const calculatedifference = (startdate: number, enddate: number = Date.now()) => {2 const second = 1000,3 minute = second * 60,4 hour = minute * 60,5 day = hour * 246 const distance = enddate - startdate7 const days = Math.floor(distance / day)8 const hours = Math.floor((distance % day) / hour)9 const minutes = Math.floor((distance % hour) / minute)10 const seconds = Math.floor((distance % minute) / second)1112 return { days, hours, minutes, seconds }13}
- Define the end-user view by inserting the following code snippet for
export const CountdownWidget.
1const [actualdate, setactualdate] = React.useState(Date.now())2const { days, hours, minutes, seconds } = calculatedifference(actualdate, enddate)3React.useEffect(() => {4 setInterval(() => {5 setactualdate(Date.now())6 }, 1000)7}, [])
- Replace the
returnvalue with the following code snippet. This defines how the countdown will be displayed to the end-user.
1return (2 <div>3 <ul>4 <li>5 <span>{days}</span> Days6 </li>7 <li>8 <span>{hours}</span> Hours9 </li>10 <li>11 <span>{minutes}</span> Minutes12 </li>13 <li>14 <span>{seconds}</span> Seconds15 </li>16 </ul>17 </div>18)
- Save the changes.
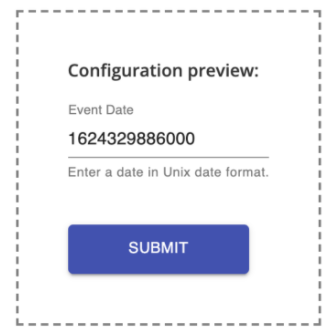
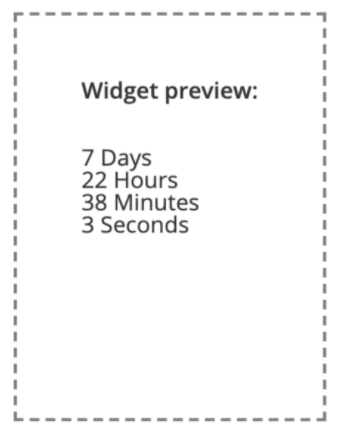
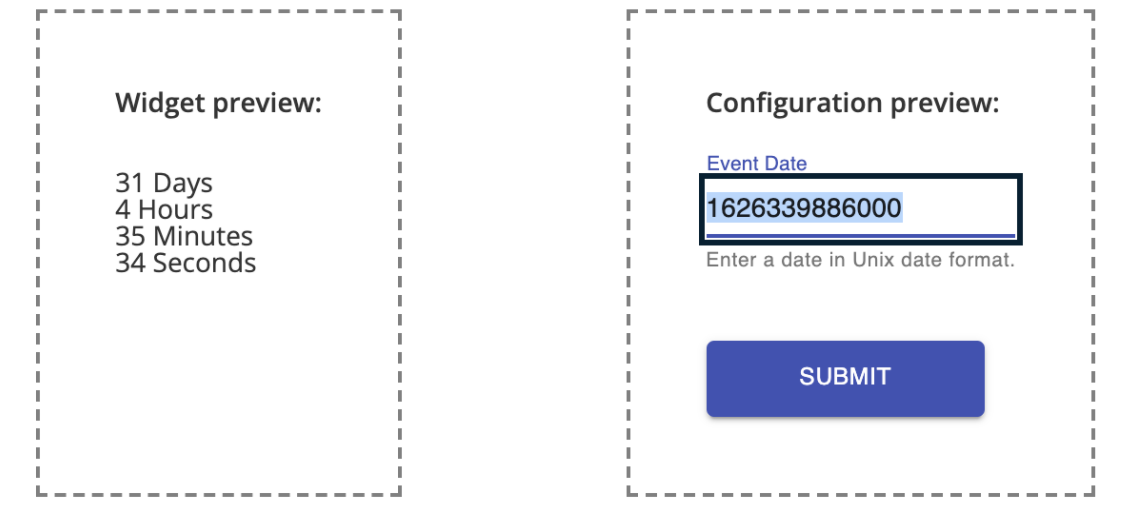
You may have already tested the widget after making changes to each file. Run it in the developer preview by providing an Event Date in Unix date format.
You’ll have to generate a unix timestamp in milliseconds, which must be a current or future date. Use a Unix date converter to generate the date in Unix format.
Ensure that your developer preview looks like this:
You have defined and tested your widget. Now you can build the widget by running the command:
npm run build
Check the message to see if the build was successful.
Once you get a message that the build was successful, you can host the widget bundle.
Under the dist folder, the .js file contains the license information and details to allow you to host the Countdown widget on a web server or a content delivery network (CDN).
After hosting the js bundle on a web server or a CDN, you can install the Countdown widget to your Staffbase platform. In the Staffbase Studio, the admin needs to install the js bundle URL in order to make it available on News and Pages. Learn more about it here.